Chapter 4: Main User Interface
This chapter provides a comprehensive guide to the SleepCoder user interface, including all functional areas, controls, and features. Understanding the interface enables efficient client consultations and optimal use of the recommendation system.
For an overview of SleepCoder concepts, see Chapter 0: Introduction. For information on managing components, refer to Chapter 3: Component Library Management.
Interface Overview
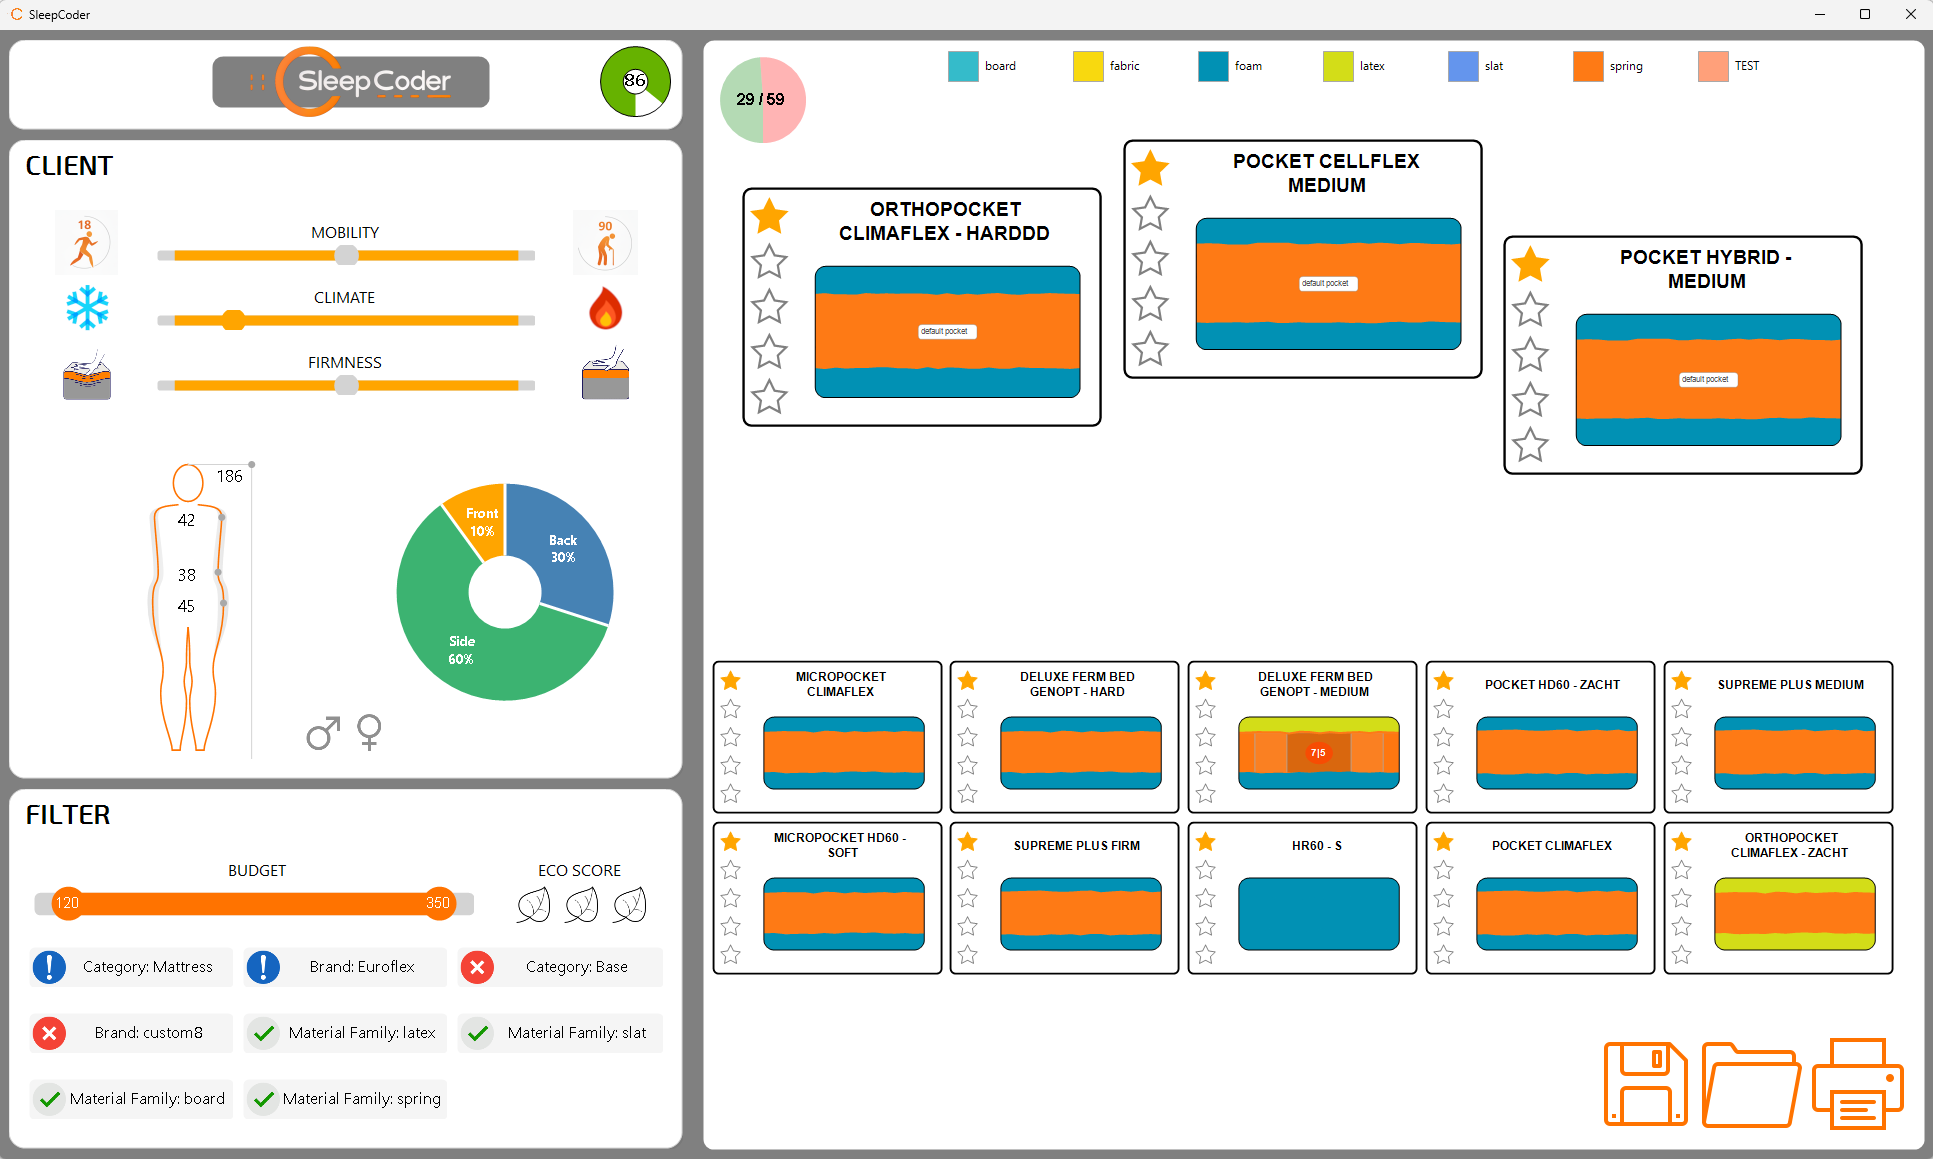
The SleepCoder interface is organized into five main functional areas, each serving a specific purpose in the consultation workflow:
1. Header Area (1)
The header contains essential controls and status information:
- Logo: Click to start a new measurement session and clear all data; right-click to access settings
- Body Score Confidence Indicator: Displays measurement confidence level (0-100%)
- 95-100%: Excellent - High confidence in recommendations
- 75-94%: Good - Reliable recommendations
- 50-74%: Uncertain - Additional measurements recommended
- Below 50%: Poor - Measurements needed
For more information on body score confidence, see Chapter 5: Body Measurement.
2. Client Input & Preferences Panel (2)
The Client Input & Preferences Panel gathers body measurements and client preferences. These are the fundamental data used by SleepCoder to calculate the scores for each sleep system in the catalog.
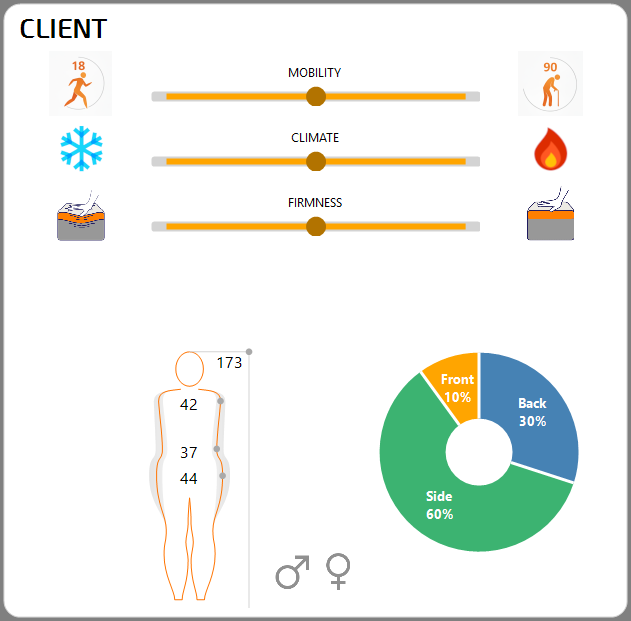
Panel Components:
- Gender Selection: Male/Female radio buttons for gender-specific calculations
- Body Silhouette: Click to enter measurements using either:
- Body Wizard (manual input with guided prompts)
- Tatchi measurement system (automated 3D scanning)
- Posture Wheel: Interactive wheel indicating back/side/stomach sleep posture preferences
- Drag the indicator to show preferred sleeping position percentages
- Multiple positions can be indicated with different weights
- Firmness Slider: Set user preferences for firmness level
- SOFT (left): User prefers a softer sleep surface
- FIRM (right): User prefers a firmer sleep surface
- Climate Slider: Set user preferences for temperature regulation
- COOL (left): User prefers to sleep cooler
- WARM (right): User prefers to sleep warmer
- Mobility Slider: Set user's mobility level
- Static (left): Lower mobility - prefers higher firmness and energy-return materials (non-visco foams)
- Dynamic (right): Higher mobility - can accommodate softer materials
- Generally decreases with age but can be influenced by circumstances (e.g., pregnancy, surgery, injury)
💡 Tip: Mobility affects material recommendations. Lower mobility typically requires firmer support and materials that facilitate movement, while higher mobility can accommodate a wider range of materials.
See Chapter 5: Body Measurement for detailed information on the body measurement process.
3. Filter Panel (3)
The Filter Panel allows you to refine the SleepCoder ranking results based on specific criteria. For example, specific materials can be set as mandatory or prohibited. Budget constraints can be applied to focus on sleep systems within the client's price range. Systems with high Sleep Scores slightly outside the budget are still shown to provide flexible options.
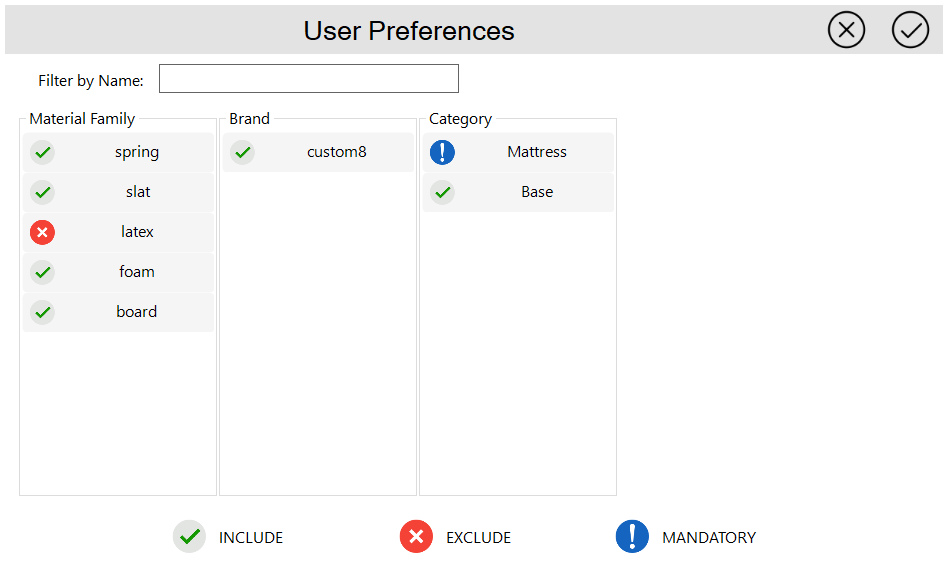
Available Filter Types:
- Brand Filters: Include, exclude, or mandate specific brands
- Budget Sliders: Set price ranges for each component type (mattress, base, pillow, topper)
- Category Filters: Filter by specific component categories
- Material Filters: Filter by material types (foam, latex, springs, etc.)
Filter States:
Each filter can be set to one of three states:
 Include: A sleep system may, but is not required to, include this item (neutral/permitted)
 Exclude: A sleep system cannot contain this item (prohibited)
 Mandatory: A sleep system must include this item (required)
💡 Tip: Use mandatory filters sparingly to avoid over-constraining the recommendations. Start with broader criteria and refine as needed based on client feedback.
4. Canvas Area (4)
The Canvas Area provides a visual representation of all possible sleep systems available in your inventory. SleepCoder automatically creates an extensive list of all possible combinations of available components in the library. In real-time, each sleep system is evaluated against the client data (body measurements & preferences). All sleep systems are ranked by score from top to bottom, left to right. When SleepCoder optimization results in a distinct classification, the best 3 systems are presented on a podium display.
Canvas Features:
- Sleep System Cards: Visual representation of each sleep system showing:
- Component images and layers
- Overall score (Support, Firmness, Climate)
- Total price
- Component brands and names
- Ranking Display: Podium view highlighting the top 3 recommendations
- Gold medal (1st place): Highest overall score
- Silver medal (2nd place): Second-highest score
- Bronze medal (3rd place): Third-highest score
- Material Legend: Color-coded legend showing material types for easy identification
- Catalog Statistics: Displays filtered systems count versus total available count
- Expert Review Badge: A yellow circle in the top-left of a card indicates the user has reviewed this system
- User Chosen System: The card with a green background indicates the sleep system that was finally chosen/advised for the client
💡 Tip: The user is free to choose any system above or below the suggested top 3. The podium serves as a starting point for discussion, not a limitation.
⚠️ Important: To help improve the SleepCoder scoring algorithm, please review the expert score for systems that were not chosen. See Chapter 6: Expert Review for details.
5. Status/Action Bar (5)
The Status/Action Bar provides tools for managing client data and generating reports.
Display Elements:
-
Client Name: Displays current client's name when previous data is loaded Display Elements:
-
Client Name: Displays current client's name when previous data is loaded
Action Buttons:
 Add Reference: Save the current client data for later retrieval

Enter client name, contact information, and optional notes. Data is securely encrypted and saved to the server.
 Open File: Load previously stored client data
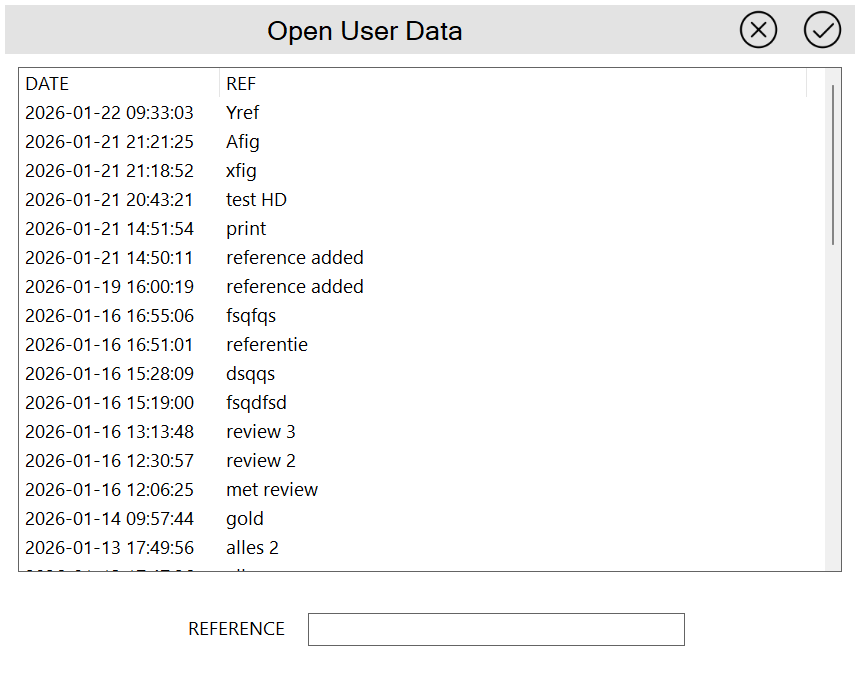
Browse and select from saved client sessions to continue a consultation or review previous recommendations.
 Expert Reviews: View an overview of all systems with expert review information

Access all expert feedback provided for different sleep systems. See Chapter 6: Expert Review for more information.
 Print: Generate a professional report of the current SleepCoder recommendation
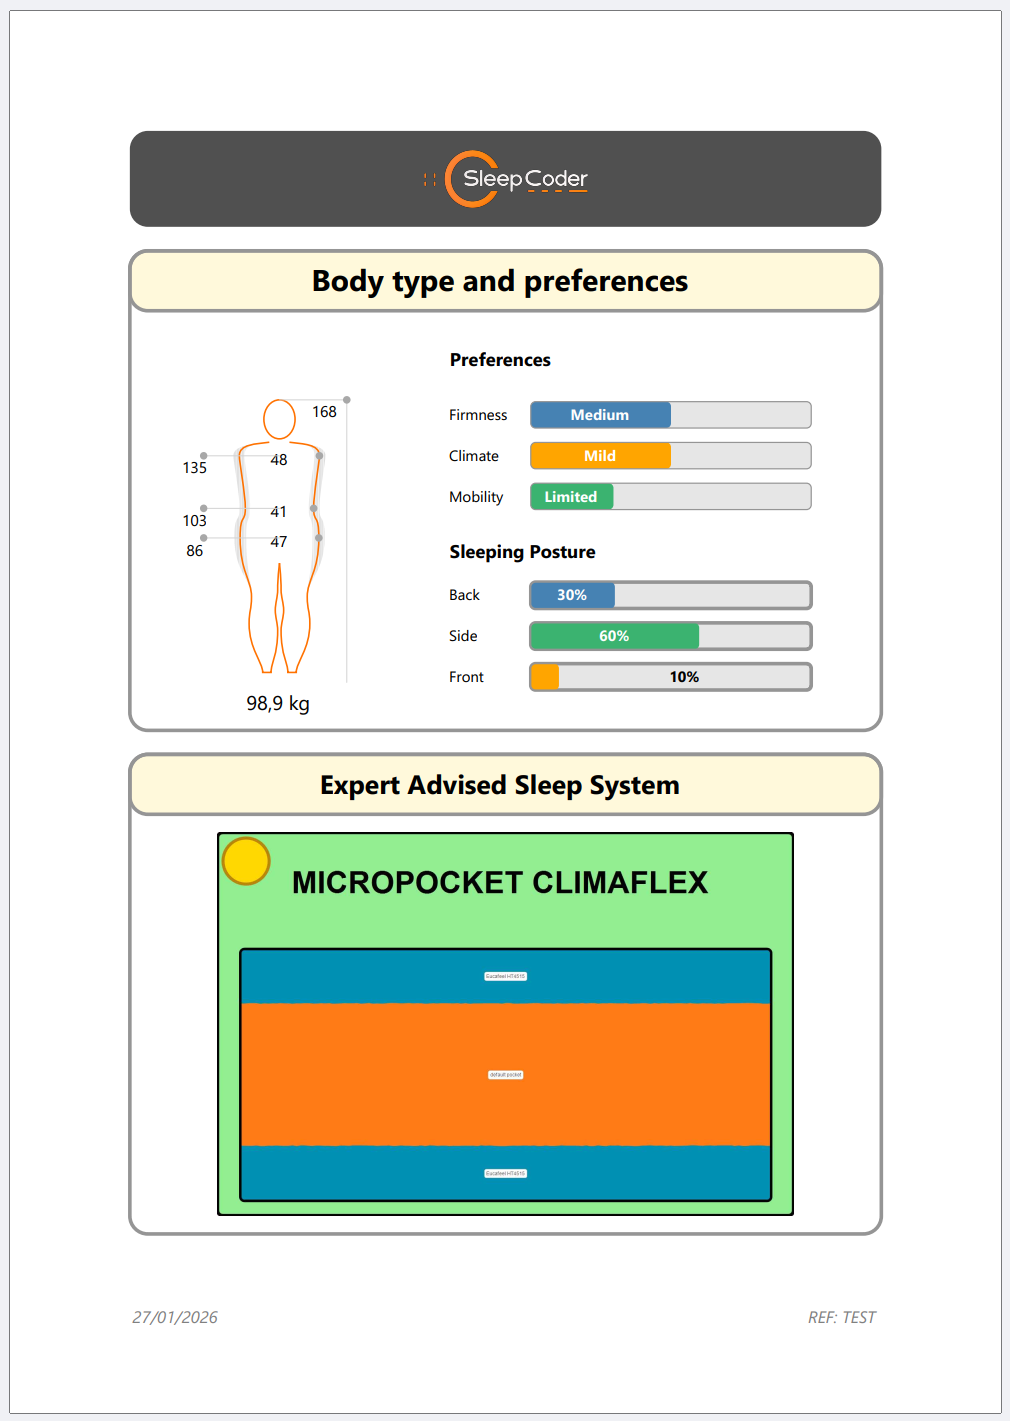
The report includes body measurements, user preferences, recommended systems, and detailed specifications. Can be printed to PDF or physical printer for client presentation.
 Expert Inspector: Advanced diagnostic tool for analyzing sleep system performance
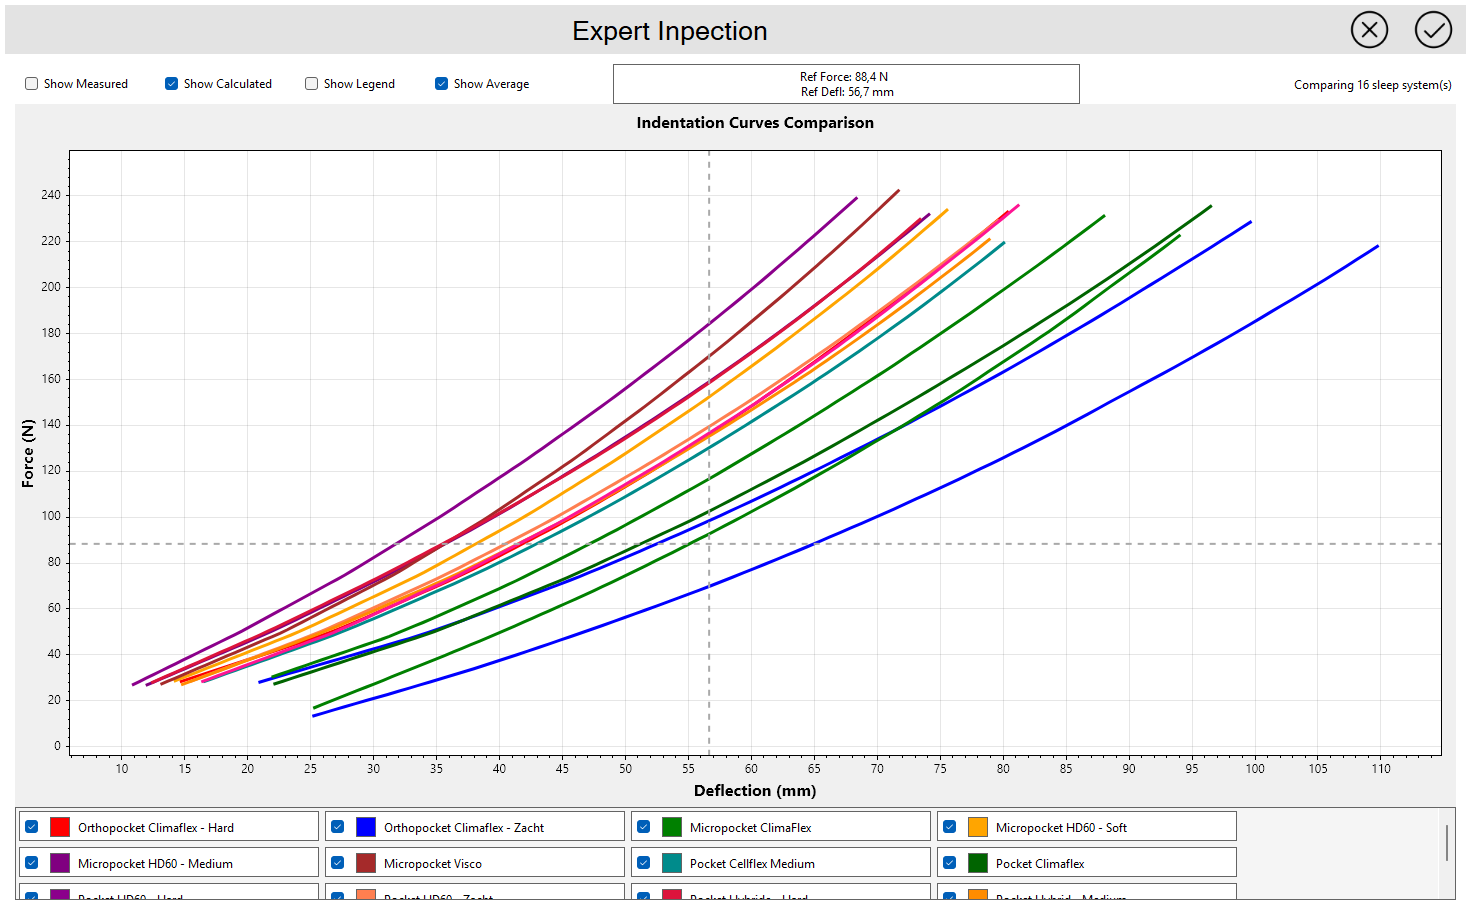
The Expert Inspector provides insights into Force-Displacement curves for selected sleep systems, enabling detailed technical analysis of support characteristics.
Next Steps: Now that you understand the interface, proceed to Chapter 5: Body Measurement to learn how to accurately measure clients, or jump to Chapter 6: Expert Review to understand the feedback system that helps improve SleepCoder's recommendations.