Chapter 3: Component Library Management
This chapter explains how to manage your sleep system components within SleepCoder. Understanding component management is essential for maintaining an accurate product catalog and ensuring optimal recommendations.
For an overview of how sleep systems are composed, see Chapter 0: Introduction. After setting up your component library, you can begin using the application as described in Chapter 4: Main User Interface.
Understanding Sleep System Constructions
SleepCoder Works with Constructions
The SleepCoder expert system evaluates all possible constructions that can be built from the list of available components. A component can be of type: topper, mattress, or base. A construction is a valid combination of 1, 2, or 3 of these components.
Valid Construction Examples:
- A mattress alone
- A mattress with base
- A mattress with topper
- A topper with mattress and base
The list of all possible constructions is automatically generated by SleepCoder based on the available components in your library. This ensures comprehensive coverage of all sleep system possibilities available in your inventory.
Accessing the Component List
To access and manage the list of components:
- Open the User Settings (right-click the SleepCoder logo)
- Navigate to the Library tab
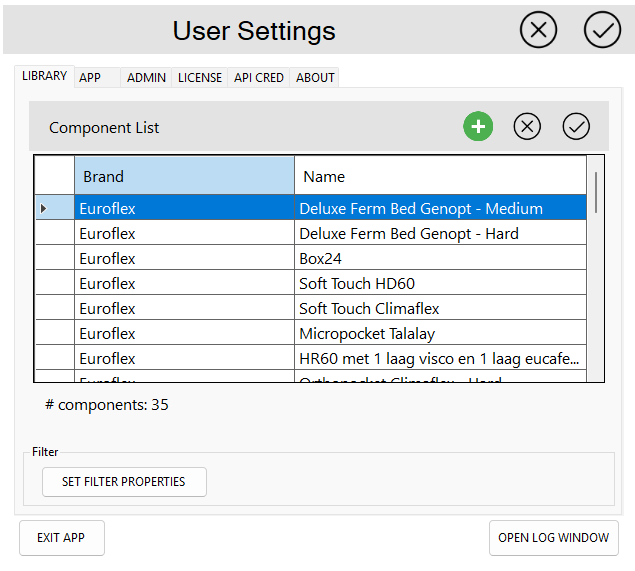
Available Actions
Select a component from the list and choose an action:
Actions:
- Add: Create a new component and add it to the library
- Select: View or edit details of the selected component
- Remove: Archive the selected component (removes from active recommendations)
⚠️ Important: An archived component will not be used to create new constructions and will not be considered by the expert system when calculating recommendations. However, archived components can still be displayed when loading existing client data files that reference them.
Viewing and Editing Component Details
The component details view displays comprehensive information about the selected component, including type, brand, name, dimensions, layers, and material properties.
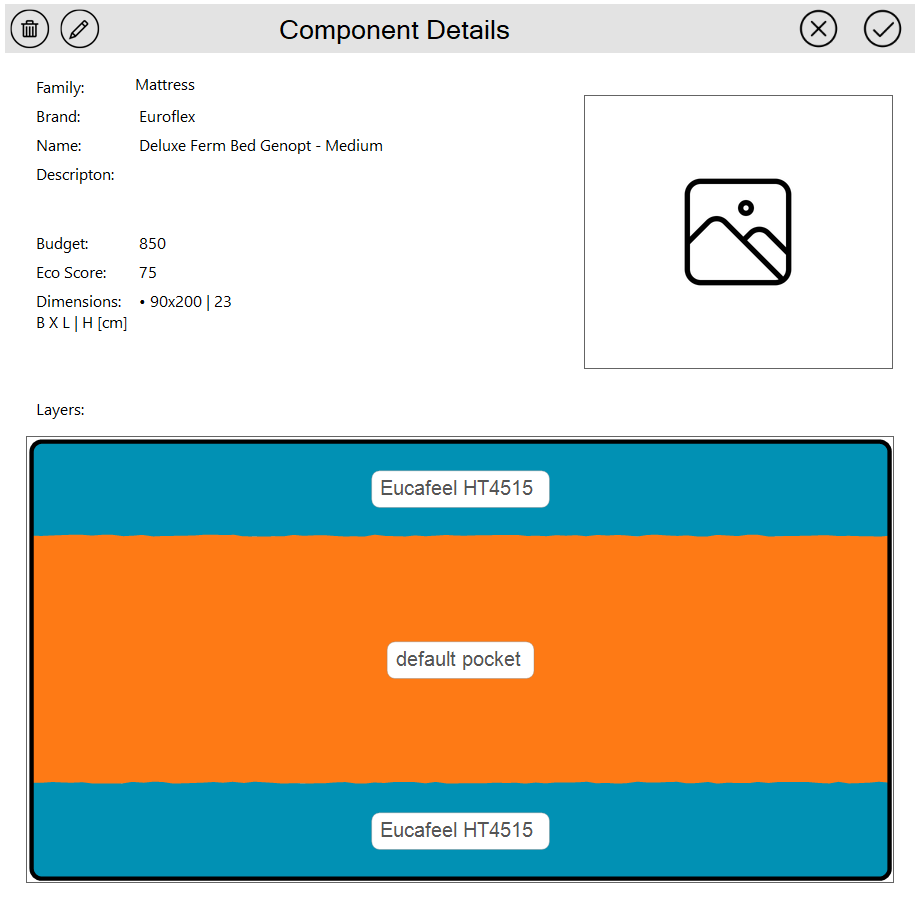
All properties can be edited to maintain accurate product information.
Mandatory Basic Information
Required fields for all components:
- Type: Select from dropdown (Topper, Mattress, or Base)
- Brand: Free text field for manufacturer or brand name
- Name: Free text field for product name or model number
- Height: Total height of the component in centimeters (should equal the sum of all layer heights)
- Size: Width × Length in cm; multiple sizes can be listed as semicolon-separated items
- Example:
80x200;90x200;140x200;160x200
Managing Component Layers
Each component consists of a set of layers, each with specific height and material properties. Layers are displayed from top to bottom in the order they appear in the physical component.
Layer Management Actions:
- Add a layer: Click the add icon (➕) at the bottom of the layer stack
- Edit a layer: Click the pencil icon (✏️) within the layer
- Remove a layer: Click the delete icon (🗑️) within the layer
- Reorder layers: Drag and drop layers with the mouse to change their sequence
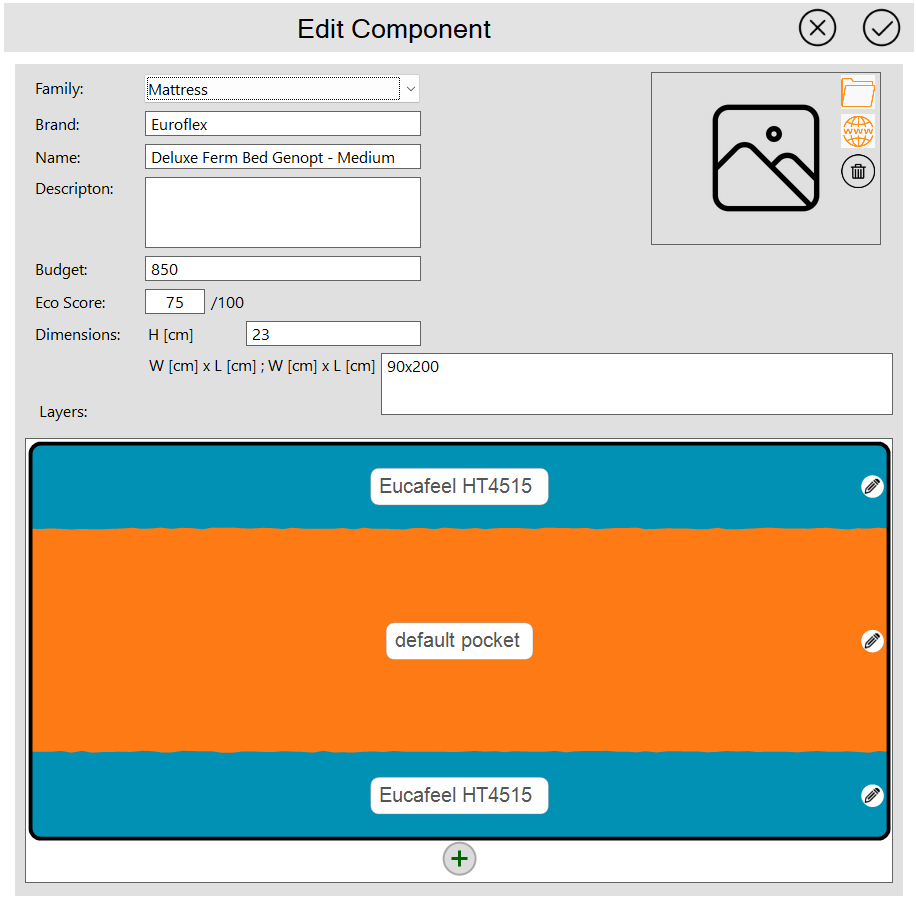
💡 Tip: The order of layers is important as it affects the sleep system's performance characteristics. Ensure layers are ordered from top (closest to sleeper) to bottom (foundation).
Editing Layer Properties
Each layer requires three mandatory properties: material, height, and zoning information.
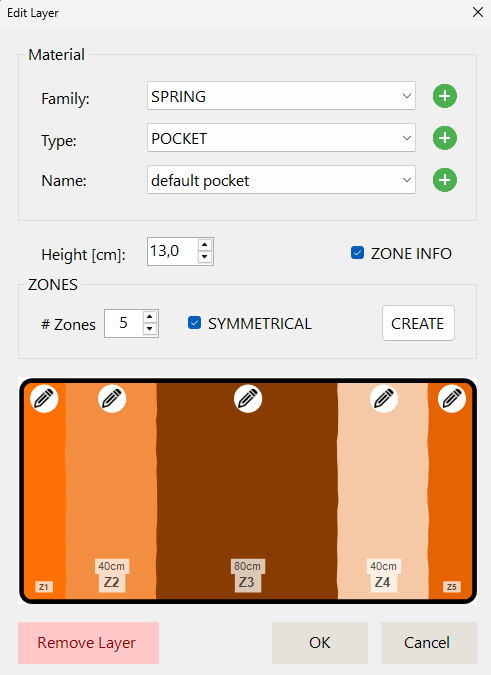
I. Material Properties
Each layer has material properties defined through a hierarchical structure:
- Material Family: Top-level category (Spring, Foam, Latex, Fabric, etc.)
- Type within the Family: Specific material type (e.g., PU, Visco, HR Foam)
- Specific Name: Detailed product name (e.g., "Eucafeel HT4515")
New items can be inserted at all levels of the hierarchy to accommodate new materials as they become available.
💡 Tip: Maintain consistent naming conventions for materials to ensure accurate scoring and filtering.
II. Height
The height of the current layer in centimeters.
⚠️ Important: The sum of all layer heights should equal the total component height specified in the basic information section.
III. Zoning Information
Layers can have uniform properties across their entire surface, or they can be divided into zones with different characteristics.
Default Behavior: If no specific zone information is set, the layer is regarded as one uniform zone with equal properties over the total size of the layer.
To Set Specific Zoning:
- Specify the number of zones in the layer
- Indicate if the zones are symmetrically distributed
- Click the Create button to generate the zone structure
- Click the pencil icon (✏️) to edit properties for each specific zone
This feature is particularly useful for mattresses with different firmness zones for shoulders, waist, and hips.
Editing Zone Properties
For each zone within a layer, you can configure specific properties related to location, size, and adjustability.
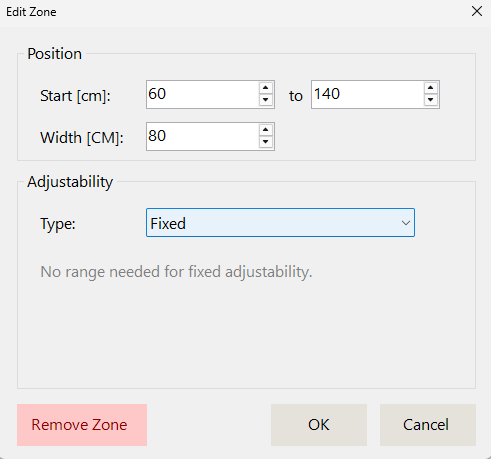
Location and Size
All zones are defined across the full width of the layer. The location and size can be specified using either of two methods:
Method 1: Start and End Positions
- Start (cm): Distance from the left edge of the layer to the start of the current zone
- End (cm): Distance from the left edge of the layer to the end of the current zone
- Width is automatically calculated when using this method
Method 2: Start Position and Width
- Start (cm): Distance from the left edge of the layer to the start of the current zone
- Width (cm): The width of the zone
- End position is automatically calculated when using this method
💡 Tip: Use whichever method is more convenient based on your product specifications.
Adjustability Options
Some zones can have variable stiffness properties, such as swappable material blocks or adjustable slat base modules. Three types of adjustability are available:
1. Fixed (Default)
- The zone has no adjustability
- Properties are constant and unchangeable
- Use for standard, non-modifiable zones
2. Select (Discrete Options)
- A discrete, limited set of possibilities
- Set as a semicolon-separated list of text options
- Example for swappable material modules:
SOFT;MEDIUM;FIRM - Useful for interchangeable foam inserts or material blocks
3. Range (Continuous Adjustment)
- A continuous range of possibilities
- Set as a value range in square brackets
- Example for adjustable slat height (±2 cm):
[-2,2] - Useful for adjustable bases with continuous height or firmness variation
⚠️ Note: Adjustable zones allow SleepCoder to recommend specific adjustments for optimal comfort, providing more personalized recommendations to clients.
Next Steps: After setting up your component library, proceed to Chapter 4: Main User Interface to learn how to use SleepCoder for client consultations, or return to Chapter 0: Introduction for an overview of the sleep system scoring algorithm.